How to Separate Personal and Business Finances as a Freelancer: The Complete System
Mixing personal and business finances is the single most common financial mistake freelancers make — and one of the most consequential. It creates unnecessary complexity at tax time, exposes LLC members to personal liability, obscures the true financial health of your business, and makes it nearly impossible to build accurate financial projections. The good news is that the solution is simple, free to implement, and requires only a few hours of setup time. Once the system is in place, financial separation happens automatically with virtually no ongoing effort.
This guide walks you through the complete system for separating personal and business finances as a freelancer, from the foundational account structure to handling edge cases like mixed-use expenses and reimbursements.
The Foundational Principle: Two Financial Universes
Think of your financial life as two completely separate universes that communicate through a single, controlled channel. The business universe receives all client income and pays all business expenses. The personal universe receives your regular salary transfer and pays all personal expenses. The single controlled channel between them is your salary transfer — a fixed amount that moves from the business to the personal universe on a regular schedule.
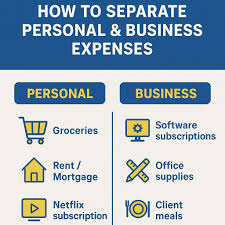
Nothing else should cross between universes. Personal expenses never come from the business account. Business expenses never come from the personal account. When this separation is maintained consistently, every financial decision becomes clear: which universe does this belong to?
Step 1: Establish Your Account Structure
The foundation of financial separation is the right account structure. You need a minimum of three accounts:
Business Checking Account: The primary hub of all business financial activity. All client payments arrive here. All business expenses are paid from here. Your accounting software connects to this account and automatically tracks every transaction.
Tax Savings Account: A dedicated account — ideally at a separate bank from your business checking — where you immediately transfer 25 to 30 percent of every client payment received. This account is psychologically and practically off-limits until quarterly estimated tax payment dates. Keeping it at a separate bank adds friction to accessing it accidentally.
Personal Checking Account: Your personal account, completely separate from the business. This account receives only your regular salary transfer from the business. Everything personal comes from here.
Optional additions as your income grows: a business savings account for large upcoming expenses or equipment purchases, a retirement savings account (SEP-IRA or Solo 401(k)), and an HSA if you use a qualifying high-deductible health plan.
→ Best Bank Accounts for Freelancers in the US
Step 2: Set Up One Business Credit Card
A dedicated business credit card is the complement to your business checking account. All business purchases — every software subscription, every equipment purchase, every business meal, every professional development course — go on the business credit card. The card is paid in full each month from the business checking account.
The benefit: every business expense is automatically recorded with date, merchant, and amount on your card statement. Your year-end summary becomes a comprehensive record of deductible expenses. You never have to dig through receipts or try to remember what a charge was for — it is all documented automatically.
→ Best Business Credit Cards for Freelancers
Step 3: Configure Your Accounting Software
Connect your business checking account and business credit card to your accounting software. Configure automatic daily transaction import. Set up transaction rules that automatically categorize recurring transactions — your monthly Zoom subscription always goes to Software & Subscriptions, your monthly cell phone bill always goes to Phone & Internet, and so on.
After the initial setup, maintaining your books requires only a few minutes per week to review and approve automatically categorized transactions and manually categorize any unusual items. The ongoing burden is minimal.
→ Best Accounting Software for Freelancers 2026
Step 4: Establish Your Salary Transfer System
Set a fixed monthly salary amount that you transfer from your business checking to your personal checking account on a consistent date — the first of the month, every two weeks, or whatever schedule works for you. This amount should be realistic for your average income: conservative enough that the business can sustain it in slow months, but sufficient to cover your personal living expenses comfortably.
Automate this transfer through your bank’s bill pay or transfer system. The automation is critical — it removes the temptation to transfer more in good months and the temptation to skip the transfer in slow months. Consistency is what makes the system work.
Step 5: Handle the Get an EIN
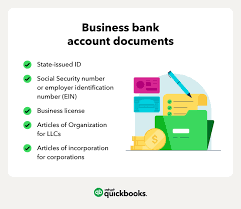
Apply for an Employer Identification Number (EIN) from the IRS if you have not already done so. The application is free and takes ten minutes at irs.gov. Use your EIN — not your Social Security Number — for all business financial accounts, credit cards, and client payment setups. This protects your SSN from unnecessary exposure and is the first step in building a business credit identity separate from your personal credit.
Handling Mixed-Use Expenses
Some legitimate expenses are a genuine mix of personal and business use. The most common examples are your phone, internet service, and home office. The IRS allows you to deduct the business-use percentage of these expenses, but you need a consistent, documented methodology.
The correct approach:
Determine a reasonable, defensible business-use percentage for each mixed-use expense. For phone and internet, many freelancers use 50 to 80 percent depending on how heavily they use these services for work. For home office, calculate the square footage percentage as described in the home office deduction guidelines.
Pay these expenses from your personal account (since they are partly personal). Reimburse yourself from the business account for the business portion. Keep a note in your records documenting the percentage used and the calculation method.
This approach keeps personal and business funds appropriately separated even for genuinely mixed expenses while allowing you to capture the legitimate business deduction.
→ Tax Write-Offs for Home Office Freelancers
What to Do if You Accidentally Mix Finances
Despite your best intentions, you will occasionally make a personal purchase on your business card or receive a client payment in your personal account. When this happens, the correct approach is simple:
Personal purchase on business card: Record the expense as an owner draw or shareholder distribution in your accounting software. Or reimburse the business account from your personal account for the exact amount. Do not simply ignore it or recategorize it — that creates inaccurate books.
Client payment in personal account: Transfer the full amount immediately to your business account and note it as a business income transfer. Do not let client payments sit in your personal account — even temporarily, this creates the commingling that causes legal and accounting problems.
The Annual Separation Audit
Once per year — ideally in January as you prepare for tax filing — conduct a separation audit. Review your business account for any clearly personal transactions. Review your personal account for any client payments or business reimbursements that were not properly processed. Review your accounting software for any transactions categorized as owner draws or personal items in the business records.
Correcting any commingling at year-end before you file your taxes is far preferable to discovering it during a potential audit later.
→ How to Budget When Your Income Is Irregular → Do Freelancers Need a Business Bank Account? → Best Accounting Software for Freelancers 2026 → Complete Freelance Finance Guide